How to show an Android Activity as a Dialog

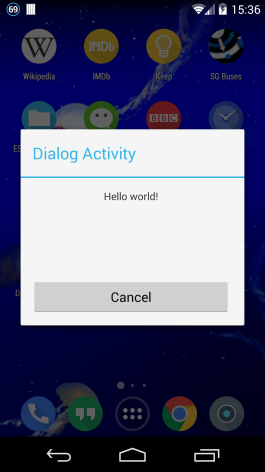
It’s possible to show an Activity as a Dialog. All we need to do is use a Dialog theme for the android:theme attribute in the AndroidManifest.xml file. You can use any Dialog theme.

<activity
android:name="com.example.demoapp.MainActivity"
android:label="@string/title_dialog_activity"
android:theme="@android:style/Theme.Holo.Light.Dialog" >
<intent-filter>
<action android:name="android.intent.action.MAIN" />
<category android:name="android.intent.category.LAUNCHER" />
</intent-filter>
</activity>

But the dialog will cancel if you touch outside. To prevent this use setFinishOnTouchOutside(false) in the onCreate method of the activity.

device-2014-10-01-153634

How to share the same SQLiteDatabase between two Android apps

According to Android developer website, “Any databases you create will be accessible by name to any class in the application, but not outside the application.” So the database is private to the application.

But what if we need to share the same data between two different apps? This tutorial will explain how it is done.

By default the SQLite databases are created in /data/data/[packagename]/databases directory. This is private to the app, so other apps cannot access this. But since we need to share the database between two apps we need to create the database in the primary external storage directory.

File dbFile = new File(Environment.getExternalStorageDirectory()+"/testdb.db");
SQLiteDatabase db = SQLiteDatabase.openOrCreateDatabase(dbFile, null);
db.execSQL("CREATE TABLE IF NOT EXISTS " + TABLE + " (" +
ID + " INTEGER PRIMARY KEY AUTOINCREMENT," + 
DATA + " INTEGER" + ");");

I create two simple apps to demonstrate this. You can download the two Android projects here.

So in both apps we need to open the database using the above code.  Then we can use the db instance to save and retrieve data.

	public void saveData(int data, SQLiteDatabase db) {
		ContentValues contentValues = new ContentValues();
		contentValues.put(DATA, data);	
		long id = db.insert(TABLE, null, contentValues);
		Log.i(TAG, "::saveData: id = " + id + " data = "+data);
	}
	
	public void getAllData(SQLiteDatabase db) {
		try {
			Cursor cursor = db.query(TABLE,
					new String[] { 
					ID, 
					DATA
			}, null, null, null, null, ID);

			if (cursor != null) {
				if (cursor.moveToFirst()) {
					do {
						int colIndex = cursor.getColumnIndex(ID);
						int id = cursor.getInt(colIndex);
						colIndex = cursor.getColumnIndex(DATA);
						int data = cursor.getInt(colIndex);
						Log.i(TAG, "::getAllData: id = "+id+" data = " + data);
					} while (cursor.moveToNext());
				}
				cursor.close();
			}
		} catch (SQLiteException e) {
			e.printStackTrace();
		}
	}
	

In our demo app we have two buttons. Add button will add some data. And Get button will get all the data.

	@Override
	public void onClick(View v) {
		switch(v.getId()){
		case R.id.btn_add:
			saveData(new Random().nextInt(5) * 10, db);
			break;
		case R.id.btn_query:
			getAllData(db);
			break;
		}		
	}
	

Then lets run the DemoApp1 and store some data in the database.  The logcat will show the following.

06-03 15:38:13.411: I/sqlitedemo1(14459): ::saveData: id = 1 data = 30
06-03 15:38:14.001: I/sqlitedemo1(14459): ::saveData: id = 2 data = 10
06-03 15:38:14.551: I/sqlitedemo1(14459): ::saveData: id = 3 data = 40
06-03 15:38:15.081: I/sqlitedemo1(14459): ::saveData: id = 4 data = 0
06-03 15:38:15.601: I/sqlitedemo1(14459): ::saveData: id = 5 data = 0

Then run the DemoApp2 and click Get.
06-03 15:38:35.721: I/sqlitedemo2(14740): ::getAllData: id = 1 data = 30
06-03 15:38:35.721: I/sqlitedemo2(14740): ::getAllData: id = 2 data = 10
06-03 15:38:35.721: I/sqlitedemo2(14740): ::getAllData: id = 3 data = 40
06-03 15:38:35.721: I/sqlitedemo2(14740): ::getAllData: id = 4 data = 0
06-03 15:38:35.721: I/sqlitedemo2(14740): ::getAllData: id = 5 data = 0

Add some more data from DemoApp2,
06-03 15:43:03.411: I/sqlitedemo2(14740): ::saveData: id = 6 data = 0
06-03 15:43:03.681: I/sqlitedemo2(14740): ::saveData: id = 7 data = 10
06-03 15:43:04.071: I/sqlitedemo2(14740): ::saveData: id = 8 data = 30

And go back to DemoApp1 and click Get,
06-03 15:44:12.421: I/sqlitedemo1(14459): ::getAllData: id = 1 data = 30
06-03 15:44:12.421: I/sqlitedemo1(14459): ::getAllData: id = 2 data = 10
06-03 15:44:12.421: I/sqlitedemo1(14459): ::getAllData: id = 3 data = 40
06-03 15:44:12.421: I/sqlitedemo1(14459): ::getAllData: id = 4 data = 0
06-03 15:44:12.421: I/sqlitedemo1(14459): ::getAllData: id = 5 data = 0
06-03 15:44:12.421: I/sqlitedemo1(14459): ::getAllData: id = 6 data = 0
06-03 15:44:12.421: I/sqlitedemo1(14459): ::getAllData: id = 7 data = 10
06-03 15:44:12.421: I/sqlitedemo1(14459): ::getAllData: id = 8 data = 30

You can see that both apps can read and write data to the shared database.

Customize Android SeekBar colors

Create the progress_bar.xml. You can define progress and background colors.

<?xml version="1.0" encoding="utf-8"?>
<layer-list xmlns:android="http://schemas.android.com/apk/res/android" >
<item android:id="@android:id/background">
<shape>
<solid android:color="#FF0000" />
</shape>
</item>
<item android:id="@android:id/progress">
<clip>
<shape>
<solid android:color="#00FF00" />
</shape>
</clip>
</item>
</layer-list>

In the Activity,

SeekBar mSeekBar = (SeekBar) findViewById(R.id.seekBar1);
mSeekBar.setProgressDrawable(getResources()
.getDrawable(R.drawable.progressbar));

device-2014-07-11-112803

You can set the minHeight and maxHeight to make the progress bar thinner.

<SeekBar
 android:id="@+id/seekBar1"
 android:layout_width="match_parent"
 android:layout_height="wrap_content"
 android:minHeight="3dip"
 android:maxHeight="3dip"
 android:layout_margin="20dip"/>

device-2014-07-11-112902

Creating a simple Vertical ViewPager in Android

Android ViewPager is a Layout Manger that allows the user to flip left and right through pages of data. But sometimes we may need to scroll vertically instead of horizontally. Here’s how I created a simple Vertical ViewPager using a ScrollView.

In the layout xml I added four TextViews into the ScrollView. Notice that the android:layout_height is set to 150dip for all childs. So only one child can be visible at once.

<ScrollView
android:id="@+id/scrollView1"
android:layout_width="175dip"
android:layout_height="150dip"
android:layout_gravity="center_vertical"
android:scrollbars="none" >

<LinearLayout
android:layout_width="match_parent"
android:layout_height="150dip"
android:layout_gravity="center_horizontal"
android:orientation="vertical" >

<TextView
android:layout_width="match_parent"
android:layout_height="150dip"
android:layout_gravity="center_horizontal"
android:background="@drawable/ic_launcher"
android:text="Item 1" />

<TextView
android:layout_width="match_parent"
android:layout_height="150dip"
android:layout_gravity="center_horizontal"
android:background="@drawable/ic_launcher"
android:text="Item 2" />

<TextView
android:layout_width="match_parent"
android:layout_height="150dip"
android:layout_gravity="center_horizontal"
android:background="@drawable/ic_launcher"
android:text="Item 3" />

<TextView
android:layout_width="match_parent"
android:layout_height="150dip"
android:layout_gravity="center_horizontal"
android:background="@drawable/ic_launcher"
android:text="Item 4" />
</LinearLayout>
</ScrollView>

In the Activity, I listen for the onFling event and scroll the ScrollView to the correct place using the smoothScrollTo method.

		final int density = (int)getResources().getDisplayMetrics().density;

		mGestureDetector = new GestureDetector(getApplicationContext(),new GestureDetector.SimpleOnGestureListener() {
			int selectedPage=0;
			@Override
			public boolean onFling(MotionEvent e1, MotionEvent e2, float velocityX, float velocityY) {
				if(velocityY<0){
					selectedPage = Math.min(3, selectedPage+1);
				}else{
					selectedPage = Math.max(0, selectedPage-1);
				}
				mScrollView.smoothScrollTo(0, 150 * density * selectedPage);
				return super.onFling(e1, e2, velocityX, velocityY);
			}

		});

		mScrollView = (ScrollView) findViewById(R.id.scrollView1);
		mScrollView.setOnTouchListener(new OnTouchListener() {
			@Override
			public boolean onTouch(View v, MotionEvent event) {
				mGestureDetector.onTouchEvent(event);
				return true;
			}

		});

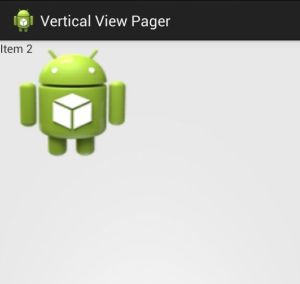
The output should look like this,
device-2013-06-26-113321


Full Android project can be found here http://www.sendspace.com/file/hz5jyn